NodeMCU Pinout
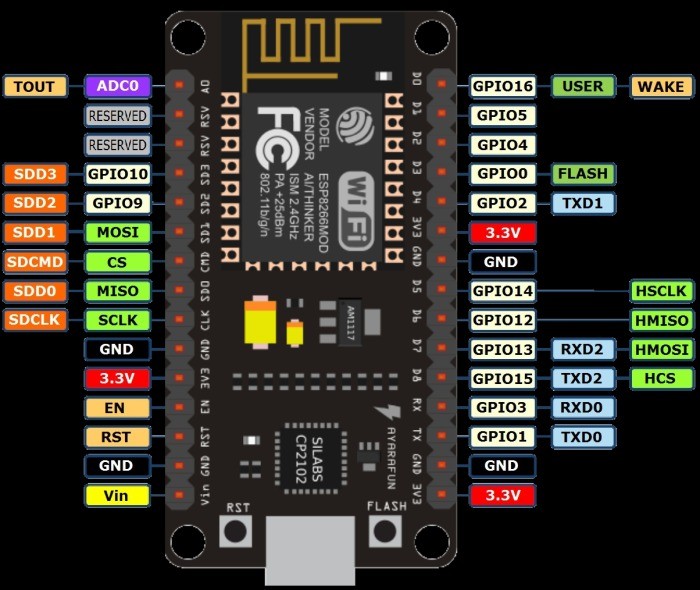
To test the board i had a DTH22 temperature / humidity sensor on hand and their is a nice tutorial on Adfruit that written as a web server.
Arduino IDE Settings
First you need the Arduino IDE the version I downloaded was 1.8.6.0
You then need to add in the support for the ESP8266 board
![]()
Navigate to File -> Preferences
and add "http://arduino.esp8266.com/stable/package_esp8266com_index.json" to the Additional Boards Manager.
Finally open Board manager located under Tools -> Board -> Board Manager
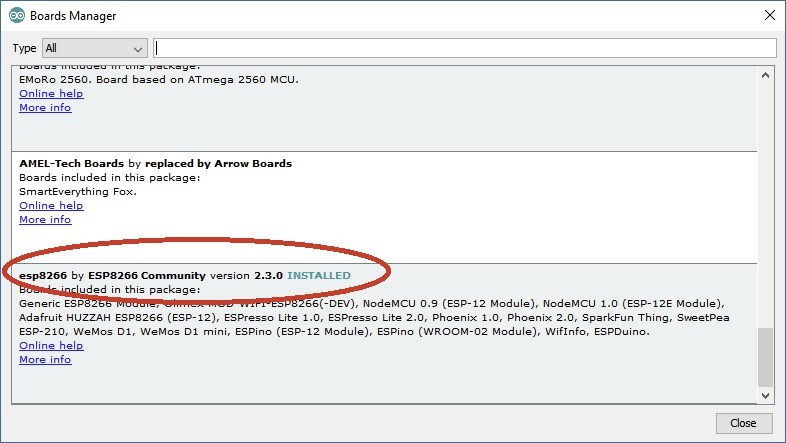
Install the esp8266 board support.
Finally select "NodeMCU 1.0(ESP-12E Module) as the board you are working with.
Set the programmer to "AVRISP mkII"
The Code
Copy the code from Adfruit and change the WiFi SSID and Password to suit, I also changed the code to output Celsius and uploaded to my board. I found that the code was returning only 1 degree of resolution in temperature when the DTH22 has a 1/10th of a degree C resolution. I have since modified the code to output the correct precision for both temperature and humidity. Also adding a readsensor function that returns a json response with the temperature and humidity values.
/* DHTServer - ESP8266 Webserver with a DHT sensor as an inputBased on ESP8266Webserver, DHTexample, and BlinkWithoutDelay (thank you)Version 1.0 5/3/2014 Version 1.0 Mike Barela for Adafruit Industries*/#include #include #include #include #include #define DHTTYPE DHT22#define DHTPIN 2const char* ssid = "yourssid";const char* password = "wifipass";ESP8266WebServer server(80); // Initialize DHT sensor // NOTE: For working with a faster than ATmega328p 16 MHz Arduino chip, like an ESP8266,// you need to increase the threshold for cycle counts considered a 1 or 0.// You can do this by passing a 3rd parameter for this threshold. It's a bit// of fiddling to find the right value, but in general the faster the CPU the// higher the value. The default for a 16mhz AVR is a value of 6. For an// Arduino Due that runs at 84mhz a value of 30 works.// This is for the ESP8266 processor on ESP-01 DHT dht(DHTPIN, DHTTYPE, 11); // 11 works fine for ESP8266 float humidity, temp_f; // Values read from sensorString webString=""; // String to display// Generally, you should use "unsigned long" for variables that hold timeunsigned long previousMillis = 0; // will store last temp was readconst long interval = 2000; // interval at which to read sensor void handle_root() { server.send(200, "text/plain", "Hello from the weather esp8266, read from /temp or /humidity"); delay(100);} void setup(void){ // You can open the Arduino IDE Serial Monitor window to see what the code is doing Serial.begin(115200); // Serial connection from ESP-01 via 3.3v console cable dht.begin(); // initialize temperature sensor // Connect to WiFi network WiFi.hostname("temphumid"); Serial.println(); Serial.println("Hostname: temphumid"); Serial.println("Set to STA mode"); //default is AP and STA mode. WiFi.mode(WIFI_STA); WiFi.begin(ssid, password); Serial.print("\n\r \n\rWorking to connect");// Wait for connection while (WiFi.status() != WL_CONNECTED) { delay(500); Serial.print("."); } Serial.println(""); Serial.println("DHT Weather Reading Server"); Serial.print("Connected to "); Serial.println(ssid); Serial.print("IP address: "); Serial.println(WiFi.localIP()); server.on("/", handle_root); server.on("/temp", [](){ // if you add this subdirectory to your webserver call, you get text below :) gettemperature(); // read sensor webString="Temperature: "+String(temp_f,1)+" C"; // Fixed to output correct precision server.send(200, "text/plain", webString); // send to someones browser when asked });server.on("/humidity", [](){ // if you add this subdirectory to your webserver call, you get text below :) gettemperature(); // read sensor webString="Humidity:"+String(humidity,1)+"%"; server.send(200, "text/plain", webString); // send to someones browser when asked });server.on("/readsensor", [](){ // if you add this subdirectory to your webserver call, you get text below :) gettemperature(); // read sensor webString="{\"Temperature\":\""+String(temp_f,1)+"\",\"Humidity\":\""+String(humidity,1)+"\"}"; //output json for web integration server.send(200, "application/json", webString); // send to someones browser when asked Serial.print("Temperature: "); Serial.println(temp_f,1); }); server.begin(); Serial.println("HTTP server started");} void loop(void){ server.handleClient();}void gettemperature() { // Wait at least 2 seconds seconds between measurements. // if the difference between the current time and last time you read // the sensor is bigger than the interval you set, read the sensor // Works better than delay for things happening elsewhere also unsigned long currentMillis = millis(); if(currentMillis - previousMillis >= interval) { // save the last time you read the sensor previousMillis = currentMillis;// Reading temperature for humidity takes about 250 milliseconds! // Sensor readings may also be up to 2 seconds 'old' (it's a very slow sensor) humidity = dht.readHumidity(); // Read humidity (percent) //temp_f = dht.readTemperature(true); // Read temperature as Fahrenheit temp_f = dht.readTemperature(); // Read temperature as Celsius // Check if any reads failed and exit early (to try again). if (isnan(humidity) || isnan(temp_f)) { Serial.println("Failed to read from DHT sensor!"); return; } }}
Open a Serial Monitor Console and you should see the application running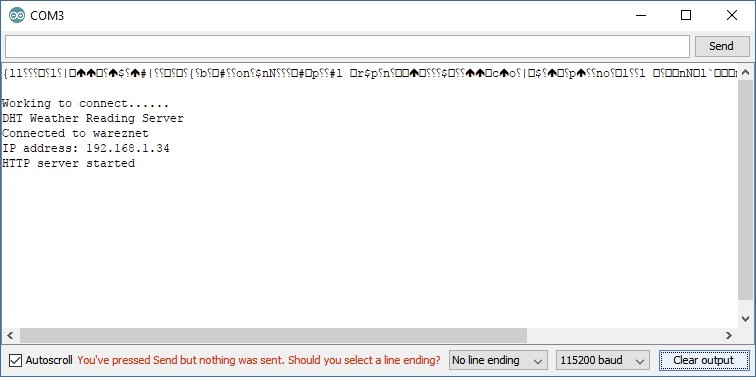
All going well you should see it report that it connected to your WiFi AP and received a IP address.
Testing the web app is as simple as pointing your web browser at the IP address.
http://192.168.1.34/humidity

http://192.168.1.34/temp

http://192.168.1.34/readsensor
Humidity: 66.5%

Temperature: 22.5 C

{"Temperature":"22.5","Humidity":"66.5"}
Summary
Great for home automation projects with WiFi in a cheap package $3USD each.
Easy to work with and very flexible as to what you can do with them. Time to think up some other uses for it and next ill be implementing a 4 x Relay Module for home automation.
Graph
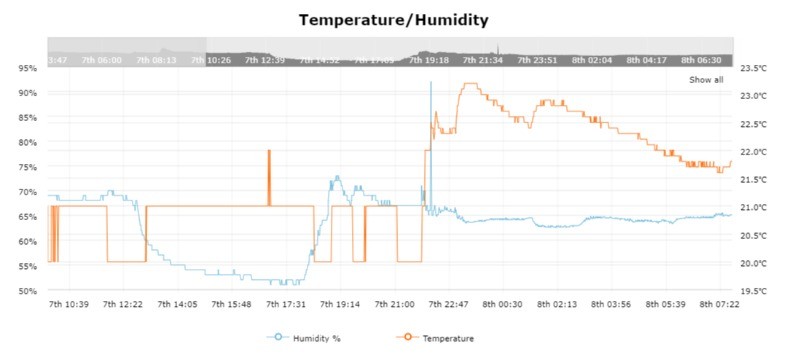
With the precision of the program fixed you can clearly see the benefit of the 1/10th of a degree vs 1 degree resolution.