Sliding Gate Project
So to beef up the security we are installing an automated sliding gate across the driveway, with being down a right of way this is the only access point to the property unless you are scaling fences from neighboring properties. As i already have a Raspberry Pi setup in the garage with 8 relays with only 2 currently in use for the watering system. Why not internet enable the sliding gate with a live camera feed from the IP camera facing the driveway entry point.
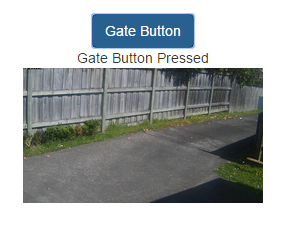
Having internet enabled the water system it was a simple extension to commission an additional relay to act as a button press for the sliding gate.
The web page
With apache and php already configured on the Raspberry Pi the code for the gate button is very simple, the button press via ajax calls a the php handler to simulate the button press using one of the relays.
Simple enough, the jquery component:
$("#gate").click(function(e){ e.preventDefault(); //alert("Gate pressed"); handler = 'gate'; $input = $('').val(handler); dataString = $input.serialize(); $.ajax({ type: "POST", url: "relayhandler.php", data: dataString, dataType: "json", beforeSend: function() { }, success: function(data) { //alert(data.submitted); console.log(data.gate); document.getElementById("gatebutton").innerHTML=data.gate; //location.reload(true); }, complete: function(data) { } }); });
The relayhandler.php file takes care of the relays
$return_arr = array();
if(isset($_POST['submitted']))
{
 $return_arr["submitted"]=$_POST['submitted'];
 //set up some pins
 $setmode4= shell_exec("/usr/local/bin/gpio -g mode 4 out");
 switch($_POST['submitted']){
 case "gate":
 $return_arr["gate"]="Gate Button Pressed";
 $gpio_off = shell_exec("/usr/local/bin/gpio -g write 4 0");
 sleep(1);
 $gpio_on = shell_exec("/usr/local/bin/gpio -g write 4 1");
 break;
 }
}

echo json_encode($return_arr);
?>
The handler triggers the relay for 1 second which should be sufficient to trigger the gates mechanism.
Adding the live camera feed.
Fortunately Zoneminder allows a hashed login feature, when using this feature it pays to turn off ZM_AUTH_HASH_IPS as this will break authentication when client is behind NAT because the IP address of the client is used to calculate the hash if ZM_AUTH_HASH_IPS is set.
To calculate the hash you can create a simple php file based on the function getAuthUser() in the file includes/functions.php like this:
// // Requires ZM_OPT_USE_AUTH and ZM_AUTH_HASH_SECRET and ZM_AUTH_HASH_LOGINS. $time = localtime(); $authKey = 'secretkey'.'user'.'msyql password hash'.$time[2] . $time[3] . $time[4] . $time[5]; //echo "\$authKey = $authKey\n"; $authHash = md5($authKey); echo $authHash; ?>
I created a user with view only access to the garage camera. To get the password hash you can use the following command to find out what it is:
mysql> SELECT PASSWORD('mypass');
Use the result of the mysql password function to replace 'msyql password hash' in the hash calculation script above. The hash calculation script can then be used to provide the correct hash for the Zoneminder camera feed and you now have a live feed of the gate with a button accessible from the internet. Don't forget to secure your web page with a login system or an .htaccess file.
Whats missing? The gate, currently being constructed, ill update the post when it is installed.